Showing posts with label MySQL. Show all posts

Thursday 27 September 2012

AWS Announcement : High Performance Provisioned IOPS Storage For Amazon RDS

 
After announcing EBS Provisioned IOPS offering lately which allows you to specify both volume size and volume performance in term of number of I/O operations per second (IOPS),  AWS has now announced High Performance Provisioned IOPS Storage for Amazon RDS.
 
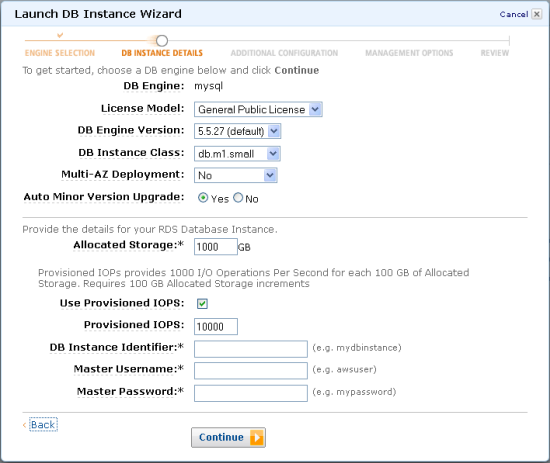
You can now create an RDS database instance and specify your desired level of IOPS in order to get more consistent throughput and performance.

Amazon RDS Provisioned IOPS is immediately available for new database instances in the US East (N. Virginia), US West (N. California), and EU West (Ireland) Regions and AWS plan to launch in other AWS Regions in the coming months.
 
AWs is rolling this out in two phases. Read on more the extract from the announcement on AWS Blog by Jeff.


                   We are rolling this out in two stages. Here's the plan:
 
  • Effective immediately, you can provision new RDS database instances with 1,000 to 10,000 IOPS, and with 100GB to 1 TB of storage for MySQL and Oracle databases. If you are using SQL Server, the maximum IOPS you can provision is 7,000 IOPS. All other RDS features including Multi-AZ, Read Replicas, and the Virtual Private Cloud, are also supported.
  •  
  • In the near future, we plan to provide you with an automated way to migrate existing database instances to Provisioned IOPS storage for the MySQL and Oracle database engines. If you want to migrate an existing database instance to Provisioned IOPS storage immediately, you can export your data and re-import it into a new database instance equipped with Provisioned IOPS storage.

We expect database instances with RDS Provisioned IOPS to be used in demanding situations. For example, they are a perfect host for I/O-intensive transactional (OLTP) workloads.
We recommend that customers running production database workloads use Amazon RDS Provisioned IOPS for the best possible performance. (By the way, for mission critical OLTP workloads, you should also consider adding the Amazon RDS Multi-AZ option to improve availability.)


Check out the video with Rahul Pathak of the Amazon RDS team to learn more about this new feature and how some of AWS customers were using it:


Responses from AWS customers :

  • AWS customer Flipboard uses RDS to deliver billions of page flips each month to millions of mobile phone and tablet users. Sang Chi, Data Infrastructure Architect at Flipboard told us:
"We want to provide the best possible reading and content delivery experience for a rapidly growing base of users and publishers. This requires us not only to use a high performance database today but also to continue to improve our performance in the future. Throughput consistency is critical for our workloads. Based on results from our early testing, we are very excited about Amazon RDS Provisioned IOPS and the impact it will have on our ability to scale. We’re looking forward to scaling our database applications to tens of thousands of IOPS and achieving consistent throughput to improve the experience for our users."
  • AWS customer Shine Technologies uses RDS for Oracle to build complex solutions for enterprise customers. Adam Kierce, their Director said:
"Amazon RDS Provisioned IOPS provided a turbo-boost to our enterprise class database-backed applications. In the past, we have invested hundreds of days in time consuming and costly code based performance tuning, but with Amazon RDS Provisioned IOPS we were able to exceed those performance gains in a single day. We have demanding clients in the Energy, Telecommunication, Finance and Retail industries, and we fully expect to move all our Oracle backed products onto AWS using Amazon RDS for Oracle over the next 12 months. The increased performance of Amazon's RDS for Oracle with Provision IOPS is an absolute game changer, because it delivers more (performance) for less (cost)."
 

Thursday 24 May 2012

Install and Configure MySQL on CentOS

MySQL is the world's most popular open source database.

MySQL Community Edition is freely downloadable version.

Commercial customers have the flexibility of choosing from multiple editions to meet specific business and technical requirements. For more details please refer to the MySQL official website.

INSTALL :


On any CentOS server with open internet, run the below command to install MySQL Community Edition:

yum install mysql-server mysql php-mysql

OR

Download the server and client rpm files from the MySQL Website depending upon the platform(OS) and architecture(32/64bit).

Install both rpm files using below command:

rpm -ivh <<rpm_filenames>>

Example:

rpm -ivh mysql-server-version.rpm mysqlclient9-version.rpm


CONFIGURE :


Once installed, run the below commands to configure MySQL Server:

1.Set the MySQL service to start on boot

chkconfig --levels 235 mysqld on

2. Start the MySQL service

service mysqld start

3. By default the root user will have no password, so to log into MySQL use command:

mysql -u root

4. To exit Mysql Console, enter below command

exit;

SET PASSWORD FOR ROOT :


To set the root user password for all local domains, login and run below commands

SET PASSWORD FOR 'root'@'localhost' = PASSWORD('<<new-password>>');

SET PASSWORD FOR 'root'@'localhost.localdomain' = PASSWORD('<<new-password>>');

SET PASSWORD FOR 'root'@'127.0.0.1' = PASSWORD('<<new-password>>');

(Replace <<new-password>> with actual password)

OR

run below command at linux shell:

mysqladmin -u root password '<<new-password>>'

(Replace <<new-password>> with actual password)

Once password is set, to login to Mysql use below command:

mysql -u root -p

Once you enter the above command, you will be prompted for the root password.

ADD NEW USER :


To add a new user for MySQL login, use the below SQL query. Remember this query must be run from the MySQL prompt.

for localhost:

INSERT INTO user (Host, User, Password, Select_priv, Insert_priv, Update_priv, Delete_priv, Create_priv, Drop_priv, Reload_priv, Shutdown_priv, Process_priv, File_priv, Grant_priv, References_priv, Index_priv, Alter_priv, Show_db_priv, Super_priv, Create_tmp_table_priv, Lock_tables_priv, Execute_priv, Repl_slave_priv, Repl_client_priv, Create_view_priv, Show_view_priv, Create_routine_priv, Alter_routine_priv, Create_user_priv, Event_priv, Trigger_priv, ssl_type, ssl_cipher, x509_issuer, x509_subject, max_questions, max_updates, max_connections, max_user_connections) VALUES ('localhost', '<<USERNAME>>', password('<<PASSWORD>>'), 'Y','Y', 'Y', 'Y', 'Y', 'Y', 'Y', 'Y', 'Y', 'Y', 'Y', 'Y', 'Y', 'Y', 'Y', 'Y', 'Y', 'Y', 'Y', 'Y', 'Y', 'Y', 'Y', 'Y', 'Y', 'Y', 'N', 'N', '', '', '', '', 0, 0, 0, 0);

for anyhostname:

INSERT INTO user (Host, User, Password, Select_priv, Insert_priv, Update_priv, Delete_priv, Create_priv, Drop_priv, Reload_priv, Shutdown_priv, Process_priv, File_priv, Grant_priv, References_priv, Index_priv, Alter_priv, Show_db_priv, Super_priv, Create_tmp_table_priv, Lock_tables_priv, Execute_priv, Repl_slave_priv, Repl_client_priv, Create_view_priv, Show_view_priv, Create_routine_priv, Alter_routine_priv, Create_user_priv, Event_priv, Trigger_priv, ssl_type, ssl_cipher, x509_issuer, x509_subject, max_questions, max_updates, max_connections, max_user_connections) VALUES ('%', '<<USERNAME>>', password('<<PASSWORD>>'), 'Y','Y', 'Y', 'Y', 'Y', 'Y', 'Y', 'Y', 'Y', 'Y', 'Y', 'Y', 'Y', 'Y', 'Y', 'Y', 'Y', 'Y', 'Y', 'Y', 'Y', 'Y', 'Y', 'Y', 'Y', 'Y', 'N', 'N', '', '', '', '', 0, 0, 0, 0);

Replace <<USERNAME>> and <<PASSWORD>> with actual username and password respectively.

Note they must be enclosed in single quotes.


DROP ANY USER :


In case, you want to drop any user use below command:

DROP '<<username>>''@'localhost';

DROP '<<username>>''@'localhost.localdomain';

(Replace <<username>> with actual username)


For more help and commands, refer --> http://www.yolinux.com/TUTORIALS/LinuxTutorialMySQL.html