Demonstration of infrastructure automation with Amazon Web Services.
Showing posts with label AWS. Show all posts
Showing posts with label AWS. Show all posts
Friday 8 June 2012
Automating Your Infrastructure with AWS
Demonstration of infrastructure automation with Amazon Web Services.
InfoWorld : The battle to stop Amazon Web Services starts here
A good blog by David Linthicum... do read!
Piston Computing's integration with VMware's Cloud Foundry surprised many, but you should expect more anti-AWS efforts...
Piston Computing plans to build a bridge to EMC VMware's Cloud Foundry, meaning it will link Piston's own OpenStack-based cloud IaaS offering. What does this mean for cloud development? It's the start of many other such integration efforts, I suspect, to battle the meteoric rise of Amazon Web Services (AWS).
Thursday 7 June 2012
Behind the Scenes of the Amazon Appstore Test Drive
The beta launch of Test Drive last week on select Android devices has many developers wondering, how does it work?
Jeff Bar, Amazon Web Services Technical Evangelist, has taken the time to walk through the technology behind Test Drive on the AWS blog. Test Drive is hosted on Amazon Elastic Cloud Compute (EC2). The Amazon Appstore team can therefore easily add additional capacity whenever needed and where it makes the most sense with respect to the incoming traffic.
Check out Jeff’s full post on the Amazon Web Services blog.

SOURCE
Jeff Bar, Amazon Web Services Technical Evangelist, has taken the time to walk through the technology behind Test Drive on the AWS blog. Test Drive is hosted on Amazon Elastic Cloud Compute (EC2). The Amazon Appstore team can therefore easily add additional capacity whenever needed and where it makes the most sense with respect to the incoming traffic.
Check out Jeff’s full post on the Amazon Web Services blog.
SOURCE
Wednesday 6 June 2012
Saturday 2 June 2012
Seeding Torrents with Amazon S3 and s3cmd on Ubuntu
Again a nice post by Eric Hammond . Hope its useful for some of you out there...
Amazon Web Services is such a huge, complex service with so many products and features that sometimes very simple but powerful features fall through the cracks when you’re reading the extensive documentation.
One of these features, which has been around for a very long time, is the ability to use AWS to seed (serve) downloadable files using the BitTorrent™ protocol. You don’t need to run EC2 instances and set up software. In fact, you don’t need to do anything except upload your files to S3 and make them publicly available.
Any file available for normal HTTP download in S3 is also available for download through a torrent. All you need to do is append the string
?torrent to the end of the URL and Amazon S3 takes care of the rest.Steps
Let’s walk through uploading a file to S3 and accessing it with a torrent client using Ubuntu as our local system. This approach usess3cmd to upload the file to S3, but any other S3 software can get the job done, too.- Install the useful
s3cmdtool and set up a configuration file for it. This is a one time step:
The configure phase will prompt for your AWS access key id and AWS secret access key. These are stored insudo apt-get install s3cmd s3cmd --configure$HOME/.s3cmdwhich you should protect. You can press [Enter] for the encryption password and GPG program. I prefer “Yes” for using the HTTPS protocol, especially if I am using s3cmd from outside of EC2. - Create an S3 bucket and upload the file with public access:
bucket=YOURBUCKETNAME filename=FILETOUPLOAD basename=$(basename $filename) s3cmd mb s3://$bucket s3cmd put --acl-public $filename s3://$bucket/$basename - Display the URLs which can be used to access the file through normal web download and through a torrent:
cat <<EOM web: http://$bucket.s3.amazonaws.com/$basename torrent: http://$bucket.s3.amazonaws.com/$basename?torrent EOM
Notes
- The above process makes your file publicly available to anybody in the world. Don’t use this for anything you wish to keep private.
- You will pay standard S3 network charges for all downloads from S3 including the initial torrent seeding. You do not pay for network transfers between torrent peers once folks are serving the file chunks to each other.
- You cannot throttle the rate or frequency of downloads from S3. You can turn off access to prevent further downloads, but monitoring accesses and usage is not entirely real time.
- If your file is not popular enough for other torrent peers to be actively serving it, then every person who downloads it will transfer the entire content from S3’s torrent servers.
- If people know what they are doing, they can easily remove “?torrent” and download the entire file direct from S3, perhaps resulting in a higher cost to you. So as a work-around just download the ?torrent URL, save the torrent file, and upload it back to S3 as a .torrent file. Share the torrent file itself, not the ?torrent URL. Since nobody will know the URL of the original file, they can only download it via the torrent.You don't even need to share the .torrent file using S3.
Uploading Known ssh Host Key in EC2 user-data Script
I have not tested this personally, but seems to be a correctly put by Eric Hammond . If you try, do let me know if you find any catchs. :)
The ssh protocol uses two different keys to keep you secure:
Note: If you have a line like the following in your ssh config file, then you are automatically answering “yes” to this prompt for every ssh connection.
There are a couple approaches you can take to check the fingerprint for a new Amazon EC2 instance. The first is to wait for the console output to be available from the instance, retrieve it, and verify that the ssh host key fingerprint in the console output is the same as the one which is being presented to you in the prompt.
Scott Moser has written a blog post describing how to verify ssh keys on EC2 instances. It’s worth reading so that you understand the principles and the official way to do this.
The rest of this article is going to present a different approach that lets you in to your new instance quickly and securely.
Using this approach, we already know the public side of the ssh key so we don’t have to wait for it to become available through the console (which can take minutes).
Generate a new ssh host key for the new EC2 instance.
Any user who can log in to the instance or who can cause the instance to request a URL and get the output, can retrieve the user-data. You might think this is unlikely to happen, but I’d rather avoid or minimize unnecessary risk.
In a production implementation of this approach, I would take steps like the following:
SOURCE
The ssh protocol uses two different keys to keep you secure:
- The user ssh key is the one we normally think of. This authenticates us to the remote host, proving that we are who we say we are and allowing us to log in.
- The ssh host key gets less attention, but is also important. This authenticates the remote host to our local computer and proves that the ssh session is encrypted so that nobody can be listening in.
The authenticity of host 'ec2-...' can't be established. ECDSA key fingerprint is ca:79:72:ea:23:94:5e:f5:f0:b8:c0:5a:17:8c:6f:a8. Are you sure you want to continue connecting (yes/no)? I don’t need this ssh session encrypted. It’s fine for any man-in-the-middle to intercept the communication.Ouch! (But a lot of people do this.)
Note: If you have a line like the following in your ssh config file, then you are automatically answering “yes” to this prompt for every ssh connection.
# DON'T DO THIS! StrictHostKeyChecking false Care about security
Since you do care about security and privacy, you want to verify that you are talking to the right server using encryption and that no man-in-the-middle can intercept your session.There are a couple approaches you can take to check the fingerprint for a new Amazon EC2 instance. The first is to wait for the console output to be available from the instance, retrieve it, and verify that the ssh host key fingerprint in the console output is the same as the one which is being presented to you in the prompt.
Scott Moser has written a blog post describing how to verify ssh keys on EC2 instances. It’s worth reading so that you understand the principles and the official way to do this.
The rest of this article is going to present a different approach that lets you in to your new instance quickly and securely.
Passing ssh host key to new EC2 instance
Instead of letting the new EC2 instance generate its own ssh host key and waiting for it to communicate the fingerprint through the EC2 console output, we can generate the new ssh host key on our local system and pass it to the new instance.Using this approach, we already know the public side of the ssh key so we don’t have to wait for it to become available through the console (which can take minutes).
Generate a new ssh host key for the new EC2 instance.
tmpdir=$(mktemp -d /tmp/ssh-host-key.XXXXXX) keyfile=$tmpdir/ssh_host_ecdsa_key ssh-keygen -q -t ecdsa -N "" -C "" -f $keyfile userdatafile=$tmpdir/set-ssh-host-key.user-data cat <<EOF >$userdatafile #!/bin/bash -xeu cat <<EOKEY >/etc/ssh/ssh_host_ecdsa_key $(cat $keyfile) EOKEY cat <<EOKEY >/etc/ssh/ssh_host_ecdsa_key.pub $(cat $keyfile.pub) EOKEY EOF ec2-run-instances --key $USER --user-data-file $userdatafile ami-4dad7424 instanceid=i-... ec2-describe-instances $instanceid host=ec2-...compute-1.amazonaws.com knownhosts=$HOME/.ssh/known_hosts ssh-keygen -R $host -f $knownhosts ssh-keygen -R $(dig +short $host) -f $knownhosts ( echo -n "$host "; cat $keyfile.pub echo -n "$(dig +short $host) "; cat $keyfile.pub ) >> $knownhosts ssh ubuntu@$host rm -rf $tmpdir ec2-terminate-instances $instanceid Caveat
There is one big drawback in the above sample implementation of this approach. We have placed secret information (the private ssh host key) into the EC2 user-data, which I generally recommend against.Any user who can log in to the instance or who can cause the instance to request a URL and get the output, can retrieve the user-data. You might think this is unlikely to happen, but I’d rather avoid or minimize unnecessary risk.
In a production implementation of this approach, I would take steps like the following:
- Upload the new ssh host key to S3 in a private object.
- Generate an authenticated URL to the S3 object and have that URL expire in, say, 10 minutes.
- In the user-data script, download the ssh host key with the authenticated, expiring S3 URL.
SOURCE
Thursday 31 May 2012
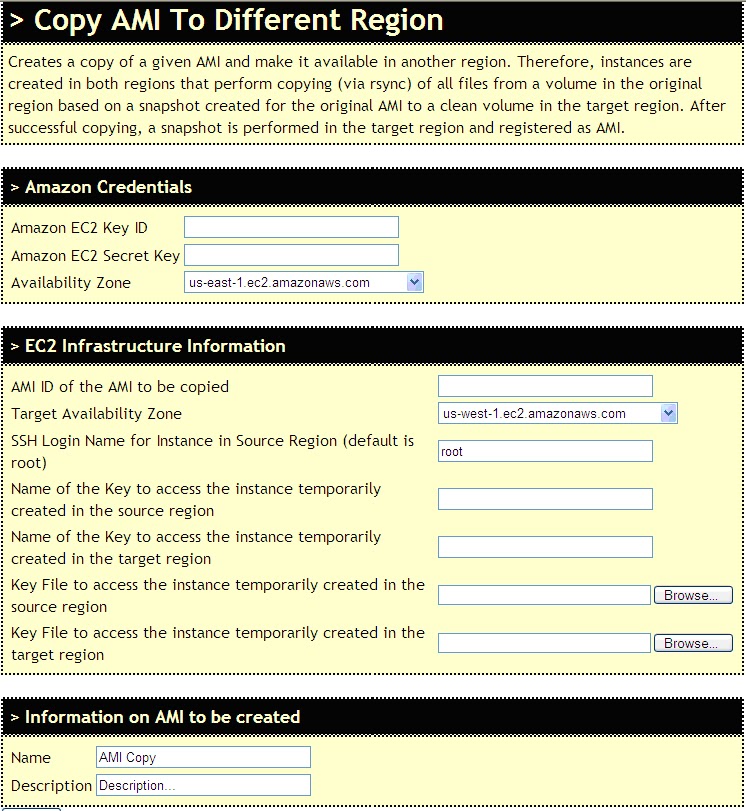
AWS - Migrate Linux AMI (EBS) using CloudyScripts
In a typical Amazon Web Services(AWS) Environment, Amazon Machine Images (AMIs) are strictly available in a certain region only. These AMIs cannot be moved from one region to another. Though the AMIs are shared within different Availability Zones of the same region.
For this purpose, you can use a third party tool called as CloudyScripts.
CloudyScripts is a collection of tools to help you programming Infrastructure Clouds.
The web-based tool is self explanatory and regularly updated. In case you find any bug, do not hesitate to email the owners right away.
Goto the CloudyScripts Copy AMI to different region tool
Wednesday 30 May 2012
AWS EBS-Backed Instance Backup &Restore
Starting with the 2009-10-31 API, Amazon Web Services (AWS) has a new type of Amazon Machine Image(AMI) that stores its root device as an Amazon Elastic Block Store(EBS) volume. They refer to these AMIs as Amazon EBS-backed. When an instance of this type of AMI launches, an Amazon EBS volume is created from the associated snapshot, and that volume becomes the root device. You can create an AMI that uses an Amazon EBS volume as its root device with Windows or Linux/UNIX operating systems.
These instances can be easily backed-up. You can modify the original instance to suit your particular needs and then save it as an EBS-backed AMI. Hence, if in future you need the the modified version of instance, you can simply launch multiple new instances from the backed-up AMI and are ready to-go.
Following are the steps to be performed for backup/restoring of AWS EBS instance into/from an AWS AMI. Also brief steps for deletion of AMI backup are noted for reference


Restore from backup AMI into instance
In case, the running instance needs to be restored, use the latest backup AMI. To launch an instance from this AMI, right-click the AMI and select Launch Instance option. The Launch Instance Wizard will be displayed, perform the usual configurations and a new instance will be created containing all the data & configurations done before backup.

Delete AMI & Snapshots:


These instances can be easily backed-up. You can modify the original instance to suit your particular needs and then save it as an EBS-backed AMI. Hence, if in future you need the the modified version of instance, you can simply launch multiple new instances from the backed-up AMI and are ready to-go.
Following are the steps to be performed for backup/restoring of AWS EBS instance into/from an AWS AMI. Also brief steps for deletion of AMI backup are noted for reference
EBS-instance to EBS-backed AMI
- Go to AWS Management Console and in the My Instances Pane, select the instance which has to be backed up.
- Right click the instance and select option Create Image (EBS AMI).

- In the Create Image dialog box, give proper AMI Name and Description. Click on Create This Image button.
- The image creation will be in progress. This will take sometime depending upon the number & size of volumes attached to the instance. Click on View pending image link. It will take you to the AMIs pane.
- The AMI will be in pending state. It is important to note that this AMI is private to the account and not available for AWS public use.

- If you select Snapshots from the Navigation Pane, then you can see that EBS volumes attached to the instance will be backed up as too.

- Once the backup is done, the AMI will be in available state.

Restore from backup AMI into instance
In case, the running instance needs to be restored, use the latest backup AMI. To launch an instance from this AMI, right-click the AMI and select Launch Instance option. The Launch Instance Wizard will be displayed, perform the usual configurations and a new instance will be created containing all the data & configurations done before backup.

Delete AMI & Snapshots:
- To delete any AMI, Right-click it and select De-register AMI.

- Remember, deleting AMI doesn’t delete the EBS volume snapshots. Click on Snapshots from Navigation pane, search & select the snapshot(s) to be deleted. Right-click on the snapshot(s) and select delete snapshot option.

References:
Friday 25 May 2012
Microsoft SharePoint on the AWS Cloud
Amazon Web Services (AWS) provides services & tools for deploying Microsoft® SharePoint® workloads on its cloud infrastructure platform. This white paper discusses general concepts regarding how to use these services and provides detailed technical guidance on how to configure, deploy, and run a SharePoint Server farm on AWS.
Deploy SharePoint quickly at lower total cost on AWS Cloud. Learn how
Deploy SharePoint quickly at lower total cost on AWS Cloud. Learn how
Tuesday 22 May 2012
Amazon CloudSearch-Information Retrieval as a Service
The idea of using computers to search for relevant pieces of information was popularized in the article “As We May Think” by Vannevar Bush in 1945.
As We May Think predicted (to some extent) many kinds of technology invented after its publication, including hypertext, personal computers, the Internet, the World Wide Web, speech recognition, and online encyclopedias such as Wikipedia: “Wholly new forms of encyclopedias will appear, ready-made with a mesh of associative trails running through them, ready to be dropped into the memex and there amplified.”
According to Wikipedia, Information retrieval (IR) is the area of study concerned with searching for documents, for information within documents, and for metadata about documents, as well as that of searching structured storage, relational databases, and the World Wide Web. There is overlap in the usage of the terms data retrieval, document retrieval, information retrieval, and text retrieval, but each also has its own body of literature, theory, praxis, and technologies.
Purpose of Information Retrieval: To find the desired content quickly and efficiently by simply consulting the index.
“News & Announcements” section in AWS Newsletter brings new surprise in terms of Amazon’s offering and the way they are expanding the domain every month. AWS users are not surprised about the surprise they are getting but its more in terms of what kind of offering will be targeted by Amazon remains surprise. In April 2012 AWS has come up with new offering that is Amazon CloudSearch.
Amazon CloudSearch offers a way to integrate search into websites and applications, whether they’re customer-facing or for use behind the corporate firewall. It’s the same search technology that’s available at Amazon.com.
Amazon CloudSearch is a fully-managed search service in the cloud that allows customers to easily integrate fast and highly scalable search functionality into their applications. Amazon CloudSearch effortlessly scales as the amount of searchable data increases or as the query rate changes, and developers can change search parameters, fine tune search relevance, and apply new settings at any time without having to upload the data again.

“CloudSearch hides all of the complexity and all of the search infrastructure from you. You simply provide it with a set of documents and decide how you would like to incorporate search into your application.
You don’t have to write your own indexing, query parsing, query processing, results handling, or any of that other stuff. You don’t need to worry about running out of disk space or processing power, and you don’t need to keep rewriting your code to add more features.
With CloudSearch, you can focus on your application layer. You upload your documents, CloudSearch indexes them, and you can build a search experience that is custom-tailored to the needs of your customers.”
Search Service: The search service handles search requests for a domain.
To see a summary of Amazon CloudSearch features, please watch this video.
Introducing Amazon CloudSearch
Building a Search Application Using Amazon CloudSearch
To see how to use Amazon CloudSearch to develop a search application, including uploading and indexing a large public data set, setting up index fields, customizing ranking, and embedding search in a sample application, please watch this video.
Building a Search Application Using Amazon CloudSearch
SOURCE : Amazon CloudSearch-Information Retrieval as a Service.
As We May Think predicted (to some extent) many kinds of technology invented after its publication, including hypertext, personal computers, the Internet, the World Wide Web, speech recognition, and online encyclopedias such as Wikipedia: “Wholly new forms of encyclopedias will appear, ready-made with a mesh of associative trails running through them, ready to be dropped into the memex and there amplified.”
According to Wikipedia, Information retrieval (IR) is the area of study concerned with searching for documents, for information within documents, and for metadata about documents, as well as that of searching structured storage, relational databases, and the World Wide Web. There is overlap in the usage of the terms data retrieval, document retrieval, information retrieval, and text retrieval, but each also has its own body of literature, theory, praxis, and technologies.
Purpose of Information Retrieval: To find the desired content quickly and efficiently by simply consulting the index.
“News & Announcements” section in AWS Newsletter brings new surprise in terms of Amazon’s offering and the way they are expanding the domain every month. AWS users are not surprised about the surprise they are getting but its more in terms of what kind of offering will be targeted by Amazon remains surprise. In April 2012 AWS has come up with new offering that is Amazon CloudSearch.
Amazon CloudSearch offers a way to integrate search into websites and applications, whether they’re customer-facing or for use behind the corporate firewall. It’s the same search technology that’s available at Amazon.com.
Amazon CloudSearch is a fully-managed search service in the cloud that allows customers to easily integrate fast and highly scalable search functionality into their applications. Amazon CloudSearch effortlessly scales as the amount of searchable data increases or as the query rate changes, and developers can change search parameters, fine tune search relevance, and apply new settings at any time without having to upload the data again.
- http://d36cz9buwru1tt.cloudfront.net/cloudsearch/CloudSearchScaling.png
“CloudSearch hides all of the complexity and all of the search infrastructure from you. You simply provide it with a set of documents and decide how you would like to incorporate search into your application.
You don’t have to write your own indexing, query parsing, query processing, results handling, or any of that other stuff. You don’t need to worry about running out of disk space or processing power, and you don’t need to keep rewriting your code to add more features.
With CloudSearch, you can focus on your application layer. You upload your documents, CloudSearch indexes them, and you can build a search experience that is custom-tailored to the needs of your customers.”
Architecture
Configuration Service: The configuration service enables you to create and configure search domains. Each domain encapsulates a collection of data you want to search.- Indexing Option specifies the field to include it is index
- Text Options, to avoid words during indexing
- Rank Expressions to determine how search results are ranked.
Search Service: The search service handles search requests for a domain.
Features
- Free text search
- Faceted search
- Customizable relevance ranking
- Configurable search fields
- Text processing options, and
- Near real-time indexing
Benefits
- Offloads administrative burden of operating and scaling a search platform
- No need to worry about hardware provisioning, data partitioning, or software patches; it will be taken care by service provider
- Pay-as-you-go pricing with no up-front expenses
Pricing Dimensions
- Search instances
- Document batch uploads
- Index Documents requests
- Data transfer
Pricing
Search Instance Type
|
US East Region
|
| Small Search Instance |
$0.12 per hour
|
| Large Search Instance |
$0.48 per hour
|
| Extra Large Search Instance |
$0.68 per hour
|
Video Tutorials
Introducing Amazon CloudSearchTo see a summary of Amazon CloudSearch features, please watch this video.
Introducing Amazon CloudSearch
Building a Search Application Using Amazon CloudSearch
To see how to use Amazon CloudSearch to develop a search application, including uploading and indexing a large public data set, setting up index fields, customizing ranking, and embedding search in a sample application, please watch this video.
Building a Search Application Using Amazon CloudSearch
SOURCE : Amazon CloudSearch-Information Retrieval as a Service.
Sunday 20 May 2012
Getting Started with Amazon Web Services EBS Volumes
Amazon Elastic Compute Cloud (Amazon EC2) is a web service that provides resizable compute capacity in the cloud. It is designed to make web-scale computing easier for developers. Amazon EC2 enables “compute” in the cloud.
Amazon Elastic Block Store (EBS) provides block level storage volumes for use with Amazon EC2 instances. EBS provides highly available, highly reliable storage volumes that can be attached to a running Amazon EC2 instance and exposed as a device within the instance. It persists independently from the life of an instance. These EBS volumes are created in a particular Availability Zone and can be from 1 GB to 1 TB in size.
Follow the below steps to Create, attach and mount EBS Volumes to launched EC2 instances:
Create the EBS Volume
Log into AWS Management Console and follow the below steps for all the each extra volume to be attached to instances. For example, let’s create and attach a 6GB EBS volume (for Oracle Alert Logs and Traces) to Database server.
• Choose “Volumes” on the left hand control panel:

• In the right-hand pane under EBS Volumes, click on ‘Create Volume’

• In Create Volume dialog box that appears:
Enter the size mentioned in table, keep availability zone same as that of Database instance and select No Snapshot and click on ‘Create’.

• This will create an EBS volume and once create is complete it will be displayed as
Attach Volume
• Select a volume and click on button to Attach Volume

• Select the instance for which EBS volume is to be attached. Also mention the mount point for the volume in device.
Here Instance is for database and mount device is /dev/sdf

• Once attached it will be displayed as
Mount the Volume
• Execute commands in the EC2 instance’s (Database Server) linux shell. As this is a new volume (with no data), we will have to format it
Run command:
mkfs -t ext3 /dev/sdf(Replace text in blue with mount device used in previous step)
• Make a directory to mount the device.
mkdir /mnt/disk1• Mount the device in newly created directory
mount /dev/sdf /mnt/disk1(Replace text in blue as required)
• By default volumes will not be attached to the instance on reboot. To attach these volumes to given mount point every time on reboot, execute the following command
echo "/dev/sdf /mnt/disk1ext3 noatime 0 0" >> /etc/fstab"(Replace text in blue as required)
Check attached volume by using command:
df -hUnmounting the volume
From the Elastic Block Storage Feature Guide: A volume must be unmounted inside the instance before being detached. Failure to do so will result in damage to the file system or the data it contains.
umount /mnt/disk1Remember to cd out of the volume, otherwise you will get an error message
“umount: /mnt/disk1: device is busy”
Hope the above steps help you get into action in minutes.
In case you get stuck at any point, do comment below. I will be glad to help. :)
Subscribe to:
Posts (Atom)